#VHS Tutorial
Explore tagged Tumblr posts
Visit Tumblr Blog
Explore Tumblr blogs with no restrictions, modern design and the best experience.
Last Seen Tumblr Blogs


Fun Fact
Tumblr has 16.74 million mobile monthly users in the US.
Text
By Kea2lie on DeviantArt
#Tutorials & References#Art Tutorial#Fake Screenshot Tutorial#Fake Screencap Tutorial#VHS Tutorial#not my art#If the original artist wants me to take this down I will
132 notes
·
View notes
Note
Could you make a tutorial on how you go about making your vhs screenshots? They look awesome and I want to try to implement that style in some of my own art. Thanks so much!!!
So i use clip studio and the settings i always see on other tutorials are only on photoshop (vibrance) so i baso made my own auto actions copying them and i've uploaded them. This will also be long becoz i always try make tutotials that I would want to see when looking up a tutorial.
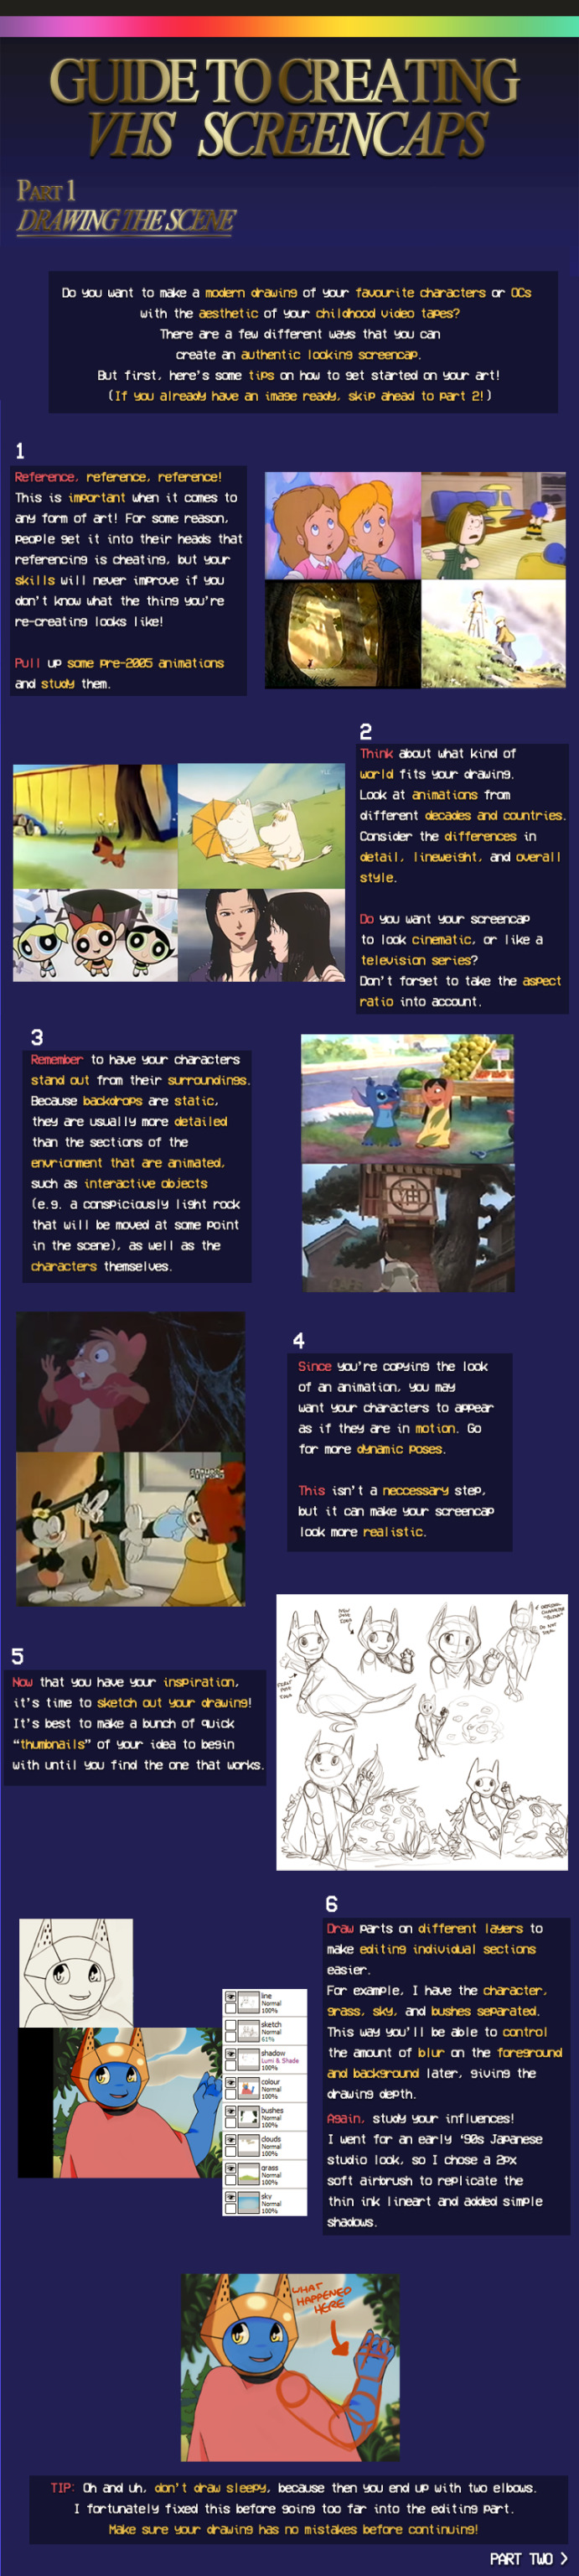
Sketch ur scene. I don't worry about sticking to 1980s (or whatever era) framing or style choices usually. For backgrounds i can do a bigger tutorial but i basically use clips gouache or some watercolour brushes for blending. Ghibli and 1942 Bambi for the textures and don bluth etc for the colours as a rough guide. I use this blog for some references but also just searching '[film name] backgrounds' or something like 'ghibli snow/roads/grass'
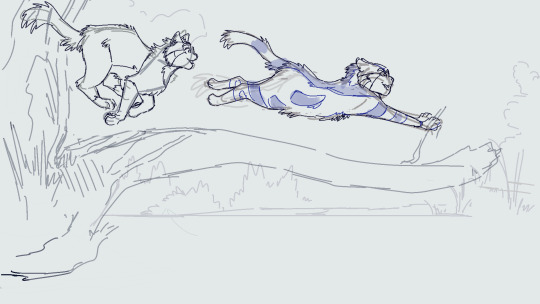
So i draw the scene. Use a dark brown for inks. Duplicate that, fill with yellow, blur 5 and 30% opacity underneath. I copy the base layer/character layer, fill with same brown and blur so its a “drop shadow”
I also duplicate the shadows, blur one about 12-18 and set both to half opacity. Same with lighting. Any rim light is the Ink layer duplicated, filled white, overlay or glow it depends on what fits best, and the bits i dont want white erased.

All text is Arial yellow with a black border. My style of drawing varies a lot by i try for a fuzzy 80s fur look- like kosperry or don bluth i guess. thats what the 'cats' layer looks like ^^^.
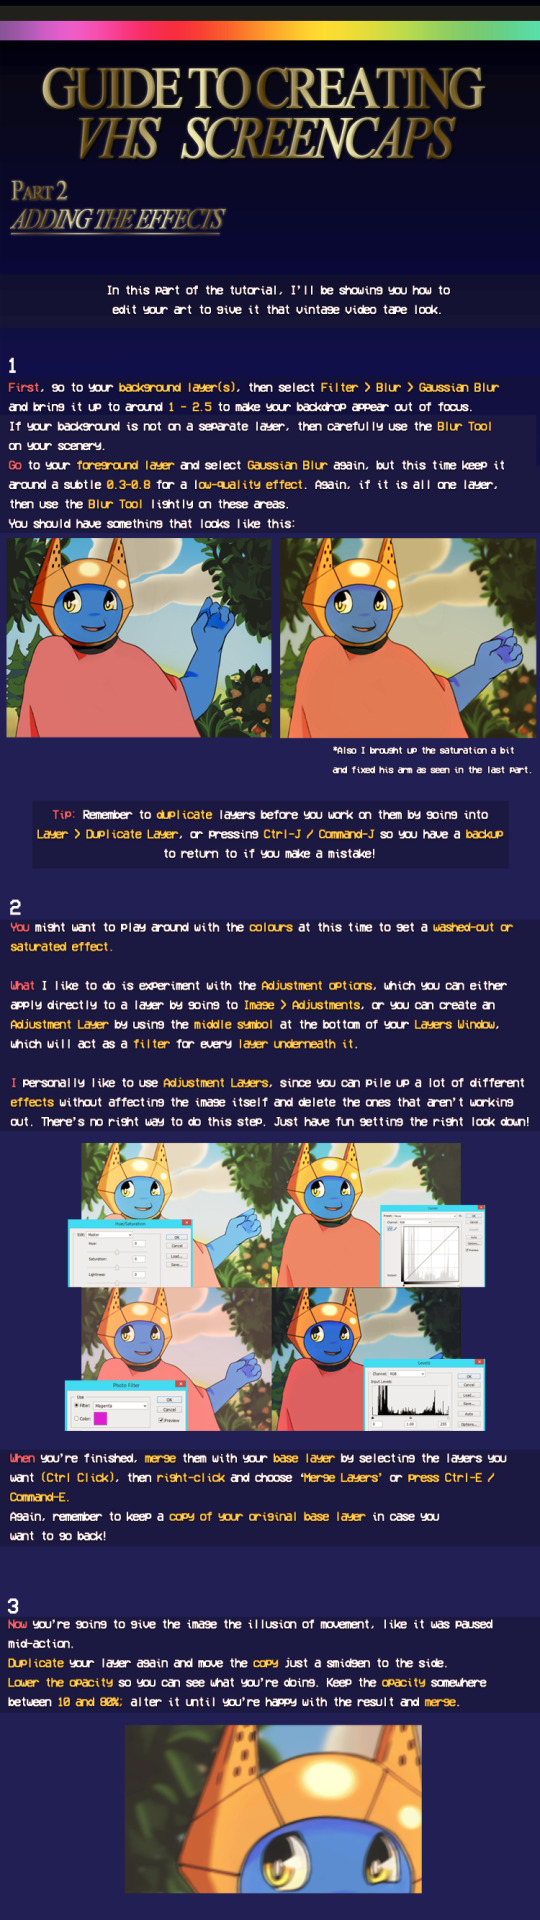
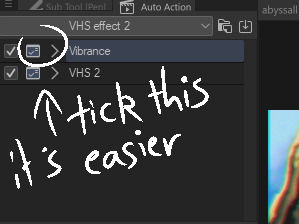
Okay onto edits. Flatten image and duplicate in case u fuck up. Auto actions are linked above (i have the box ticked/the action closed to speed things up and only adjust the important bits)
Blur - gaussian, start mild and u can build up from there.

Fake vibrance- you can use saturation ig but this (to my knowledge) targets the light and shadow differently. I literally copied how the photoshop vibrance works. I use anywhere from 25-85 strength (mainly 40), it looks less saturated once u click okay so just experiment.
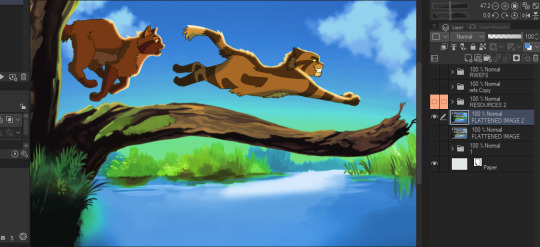
Chromatic abberation - I use this one. Move to liking and merge
Vhs 2 - this is the other auto action i made, it’s basically another blur, motion blur and some image adjustments.
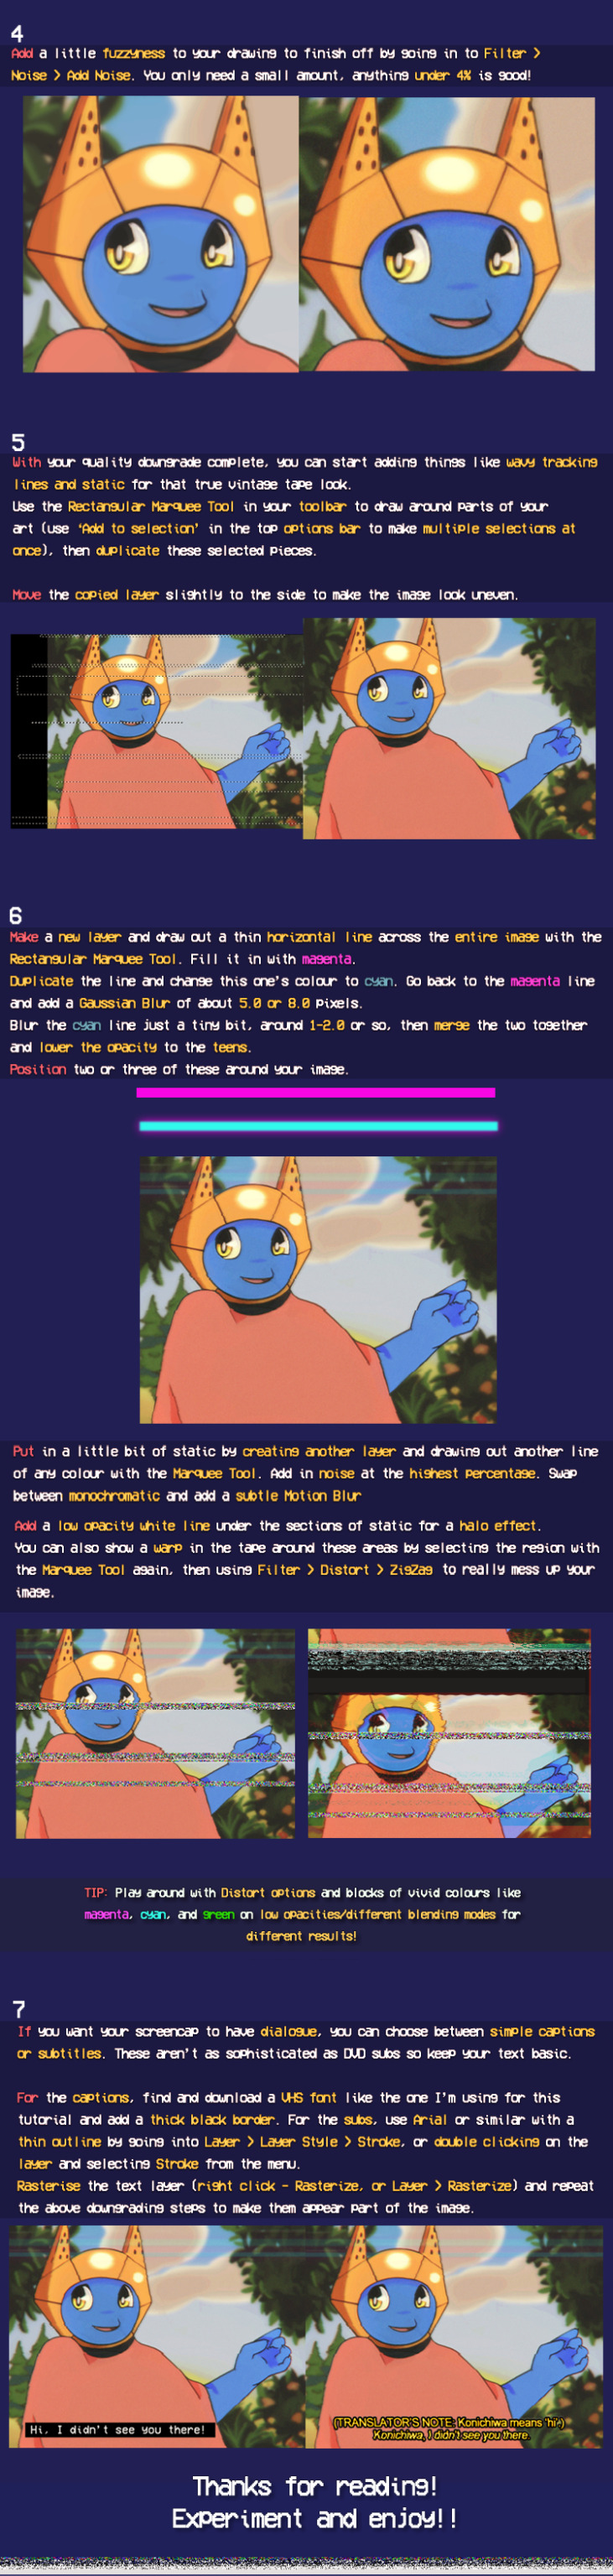
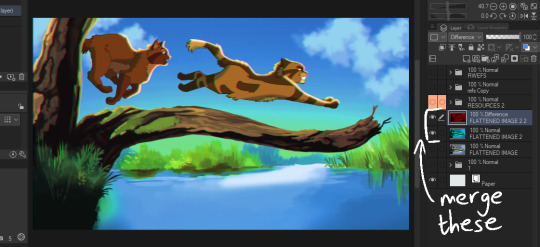
Final additions - 1 is a noise layer (clip studio perlin noise), 2 is a free VHS overlay set to hue (find one with colours u like!), 3 is a new layer filled with a bright colour/colour that fits the vibe you are going for (here i used blue for the blue background + sunny vibes) set to lighten and adjust
and thats it for me!
Happy VHSing!
#please let me know if these autoactions work! there shud be two in the download!!!#warrior cats#vhs#ghibli aesthetic#retro aesthetic#art tutorial#vhs tutorial
130 notes
·
View notes
Text


i learned how to make images look vhs-y and im obsessed with it. here's the brush i used for step 4
#ome's art#pokemon#art tutorial#art vhs tutorial#vhs tutorial#vhs aesthetic#vhs#vhs art#vhs art tutorial#hiiiiiii
27 notes
·
View notes
Text


More photos from my digital camera (7.2 megapixels)
#thought it had been a while#one of my favourite shirts#my girlfriend bought this crt tv#so she could watch sewing curtains tutorials#on a vhs#it’s super nostalgic I haven’t tapped on a screen and heard the ding in so long#y2k#y2k aesthetic#y2k style#y2k nostalgia#y2k icons#2000s web#old web#2000s#early 2000s#2000s internet#crt tv#vintage games#digital camera photo#digital camera
898 notes
·
View notes
Text

hello and welcome to my tutorial on how to create gifs like this one! full explanation under the cut, but if you wanted to take a little peek at the gifset attached to this tutorial, here ya go!
for the purposes of this tutorial i am assuming you know
how to make a gif
what vhs footage looks like
STEP ONE: MAKING YOUR GIF
choose your footage and plug it into your desired software of choice! i use photoshop for this so i can only attest to the efficacy of these methods in that context
as for shot selection, you could feasibly choose anything. however, i prefer shots without too much movement in them - makes it look more like a home video.
because of the heavy amount of colors and filters, i'd recommend a gif somewhere around the 40-50 frames! but of course you can play around.
oh i also set the frame delay to 0.08 seconds. this is slower than most gifmakers tend to set theirs, but it makes it run buttery smooth imo.
STEP TWO: MAKING THE COLORING
here's where we get vhs specific. if you're unfamiliar with vhs footage, i recommend clicking through this youtube playlist! if you're not interested in the coloring, skip to step three (smart object fuckery + filters)
now while making a set i tend to choose some primary colors for my gifs. in the gifset i linked above, i chose to work with blue and orange-y yellow. in some of the other gifs i'll be using as examples (from an unfinished set) i chose green and yellow.


to create the above coloring i generally use these steps:
1) curves
i'm a maniac so i use the same curves layer to initially edit the luminosity AND colors of my gifs. the purpose of this layer is to edit brightness/contrast like i normally would and already start the process of changing the colors a little bit. this is my curves layer for the blue house gif:

to make the gif go from the left image to the right image:


as you can see i used the brightening curves to make the footage a whole lot lighter. i also increased the reds to get rid of the cyan tint a lot of blue footage has, slightly increased the blues, and once again decreased the greens to get rid of any cyan. this does make the blue hue a bit more purple, which is a nice bonus!
as for the gif of the boy, that one's a little harder to show a before and after for, but i'lls how the curves for good measure:

the original shot was already quite bright so i only edited the brightness a litttle bit. because i knew i wanted the gif to be green and yellow, i increased the greens, decreased the reds (except in the shadows), and decreased the blues (to get yellow)
2) channel mixer
now the channel mixer layer takes a little getting used to so i recommend experimenting. ALWAYS USE THIS LAYER ON THE COLOR BLENDING MODE for a more even result.
i use channel mixers to sort of... unify the colors a bit more. for the house gif, for example, i increased the blue channel to +110% blue, but decreased the blue in the red (-12%) to retain the yellow in the window.
if you want me to explain this more in depth, send an ask! it'll be kinda longwinded though


before / after of the boy gif with curves/channel mixer.
3) levels
this is where it starts looking more vhs-y! vhs footage has light shadows and dark highlights.
first, set your levels layer to luminosity blending mode to retain your beautiful colors.
then, crunch the hell out of your gif to make it very... mid.


this may feel a little wrong at first but i prommy it'll look okay at the end. a before/after for the boy:


now that's starting to look familiar right?
4) color fill/gradient map
because i want to unify my colors/make sure my gif is saturated, i usually add either a color fill or gradient map layer. in the case of the house, i chose to go with a dark blue color fill:


because the coloring of the boy gif was a little more complex, i decided to go with a brown to green gradient map.

this will make the shadows yellow, and the highlights green.


BOTH THESE LAYERS ARE SET TO OVERLAY. i usually fiddle with the opacity of them until i like it, but it's anywhere from 7% - 17% depending on what i feel like that day
5) curves (again)
this layer is probably useless but i do it anyway to make myself feel better. this is just a regular curse layer to up the brightness a tiiiiny bit and amke sure everything's clear. also it helps counteract the darkness your overlay color will add in.
6) color balance
this is my most subtle layer so i won't be able to show before and after but i fiddle with the color distribution a little until i'm satisfied. set this layer to color blending 'cause that's what you wanna affect!
i decided i wanted the house gif shadows to be a little more purple, for example, so i added in red (+3), magenta (-1) and blue (+1). etc etc. do what feels good!
STEP THREE: SMART OBJECT FUCKERY AND FILTERS
OKAY that was a lot. sorry or you're welcome. but good news: now's the fun part. convert your animation to a timeline, then select both your coloring and gif layers, right click, and select convert to smart object.
now that your gif's a smart object, i usually crop it. i tend make vhs aes gifs a 4:3 ratio (so 540 x 405 px) because that's what vhs footage was usually recorded as! crop your gif, resize, and then we can continue.
1) color bleeding
vhs footage usually bleeds its colors - this manifests as a short of... weird subtle halo around any object. the way to recreate this in photoshop is to duplicate your smart object.
set your copied smart object to color blending. now move it to the side a couple of pixels (i usually do around 5px, but you do you!)


as you can see, the tree and chimney (and everything else but less prominently) have a yellow shadow to them. this is exactly what we want!
2) filters
now's the time to add your filters and make it look like shit (but on purpose!) first, select both smart objects and convert to smart object again. this will ensure the filters apply to all layers evenly.
i use the following filters:
unsharp mask (amt 35%, radius 4px) - this will subtly add some sharpening but only on the edges of objects
add noise (amt 7.5%, distr. uniform, not monochromatic) - this will add the signature vhs grain.
box blur (2px) - i edit this to be 75% opacity with the little arrows to the right, just to make sure you can still make SOMETHING out when you're looking at the gif. MAKE SURE THIS FILTER IS ON TOP OF YOUR NOISE FILTER. tumblr will kill your gif otherwise
4) ONE LAST THING
usually at this point i'm not happy with either the saturation or levels. (usually the levels). so on top of your smart object, add another saturation or levels layer and fuck around!
in the case of the house gif, i thought it was too bright still so i set my output levels to 13 and 216. for the boy, i thought the shadows were too dark, so i set my shadow output to 11.
BEFORE & AFTER:


aaaand that's it! thanks for reading! if you have any questions, feel free to come to my askbox, i'm always happy to explain my process. happy giffing 🥰
#gif tutorial#ps tutorial#photoshop#completeresources#allresources#giffing tutorial#vhs gif tutorial#idfk. what do you even tag for tutorials lmao
319 notes
·
View notes
Note
How do you get that grainy texture on your art? It’s very nice!
thank you!! i love art that's soft and fuzzy...
i generally do it a handful of different ways, but i tend to bounce between a color noise filter layer in soft light mode, between 30% and 50% opacity,

... or i use something from my wide array of paper textures, and usually set the layer to overlay and play with opacity till i'm happy with it

......oooorr i do a combination of the two! which i did in the final version of this piece, which i Also added a gradient map to to make the colors a lil more ✨Dramatic✨
here's where i got (most of) my paper textures and here's a rainbow color noise texture (that i don't personally use but looks rlly similar!)
#i actually use a color noise filter from a VHS auto action set i used to use on my VHS icons. if yall remember those#my art#ask#tutorial#i guess??#idunno#if you have more questions feel free to dm me! i love clip and i love to teach ppl abt all its cool features#dinosaur#since i prolly wont seperate post my landscape study tht i threw a spinosaurus on
110 notes
·
View notes
Text
Tamagotchi Video Adventures (Video, 1997)
You can watch it here, or read an article about it here.


#internet archive#video#videos#vhs#vhs tapes#vhs aesthetic#cartoon#cartoons#animation#direct to video#obscure cartoons#obscure animation#tamagotchi#puppet#puppets#puppetry#drawing tutorial#1997#1990s#90s
20 notes
·
View notes
Note
How do you nail that movie screencap effect thingamajig?? I'm a sucker for VHS-animation looking stuff but sometimes fiddling with blending modes, gaussian blur, noise, ntscQT etc. just doesn't feel right.
For me, I love experimenting with a mix of using blending modes and using ntscQT, but I definitely get the feeling of it still not feeling right despite using those methods!
I'll do my best with explaining how I go about achieving the look! The art software I use is Paint Tool Sai 2 (but any art software with blending modes + layers will do!). Apologies in advance if this is too wordy haha
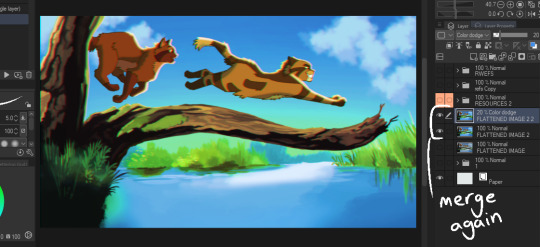
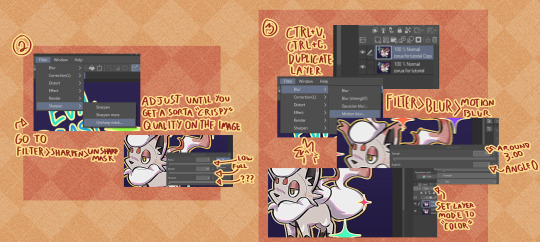
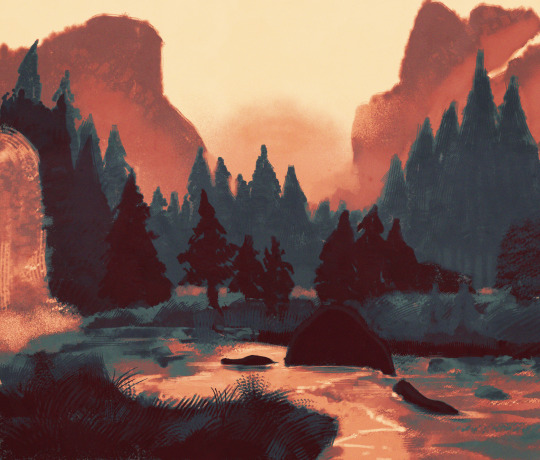
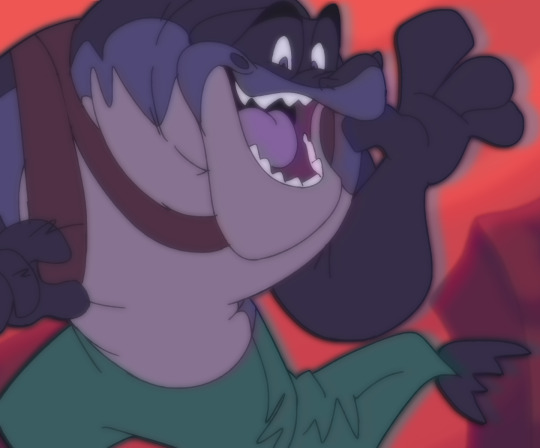
1.) I draw the usual setup- a background with a character or so. I usually flatten all the layers into one but, for this case, I just only flattened the layer the character's on:

2.) I duplicate the character layer, blur it, set its blending mode to "Lighten", and adjust the opacity as needed before merging the two layers together. I duplicate again, blur again, set the mode to "Darken", adjust opacity, and merge again!

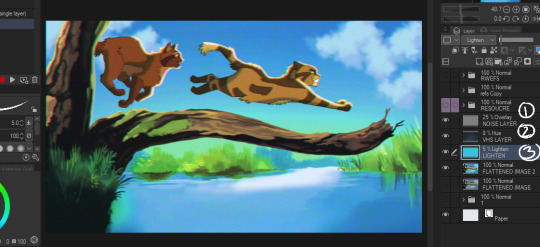
3.) (1st pic) Once I do that, I duplicate & blur the character layer again, then move it a bit to the side (any direction is fine; for this I moved it to the right). Then I set the moved layer's mode to "Color"! After that, I add a drop shadow behind the character layer to give it the look of a traditional animation cel being used.
(2nd pic) Next, I flatten ALL the layers now into one layer, duplicate it and blur it greatly + set blurred layer mode to "Saturation" & move it in any direction before merging all layers again!! lots of duplicating and merging LOL!!!

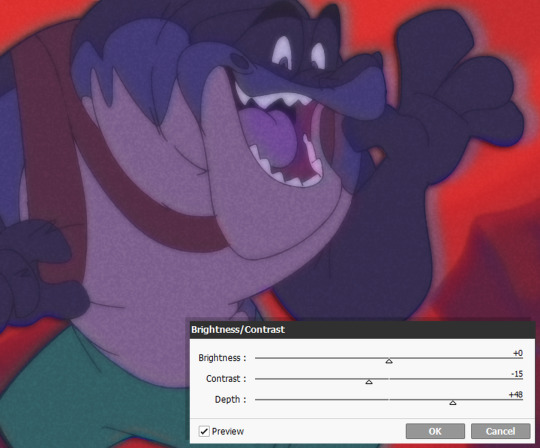
4.) OK THE LAYER DUPLICATION + MERGING PROCESS IS FINISHED FINALLY! Now we just adjust the colors!
I like to lower the Contrast and raise the Depth, though the adjustments can vary with each piece, depending on how much of a effect you want! Image on right includes the settings I used for this. (I also added a noise layer, but that's optional)

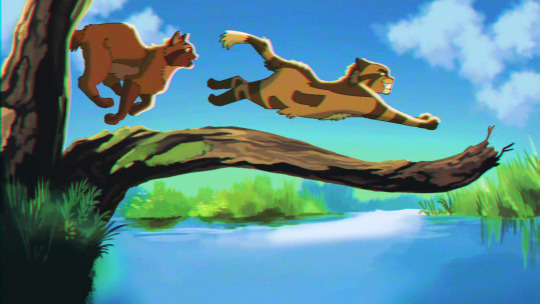
5.) And for the final step.... make the image a smaller size and save as a JPEG/JPG file!!! This should somewhat achieve the low-quality crunch look!
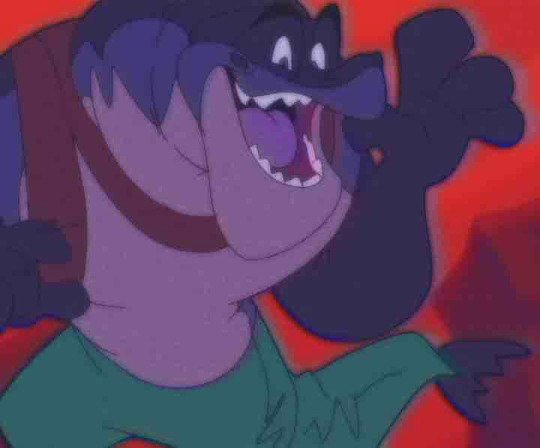
This step is entirely optional, but you can take the JPEG image and add it to ntscQT to mess around with different settings! Here's one I put together:

61 notes
·
View notes
Note
hey i was just wondering how you make your art have that kinda film grain/old vhs type quality? its just so monch-able and i wanna do that with my art :3
I actually just made a video for TikTok about it tee hee
But too long didn’t watch: I use the app prequel and CapCut to add the filters
( prequel says ai in the description but I think it’s more bcus it’s a trendy word and they might have one weird Cartoon Me filter )
But yeah yummy prequel filters n effects: lomiograph, Oklahoma, brownie, vhs, and Miami
And then capcut has an effect in the tv section called betamax and she’s scrummy yum yum
And also lowering the contrast adding fade lowering highlights adding noise adding dust stuff like that :3
187 notes
·
View notes
Text
📼 Procreate “VHS Glitch” Tutorial 📼
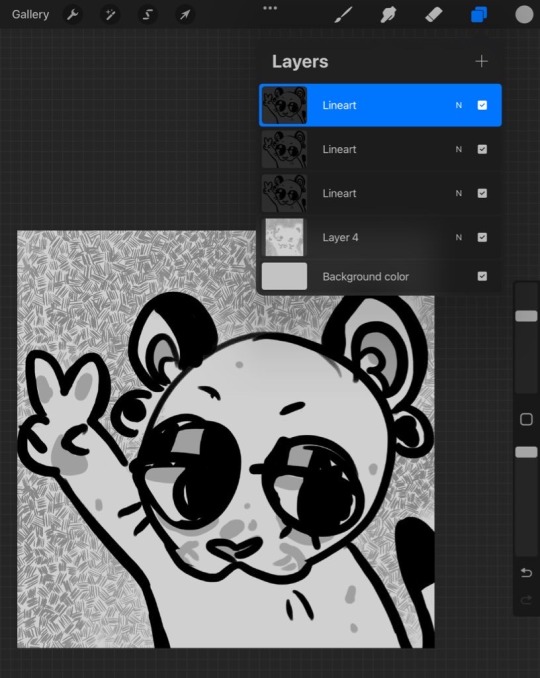
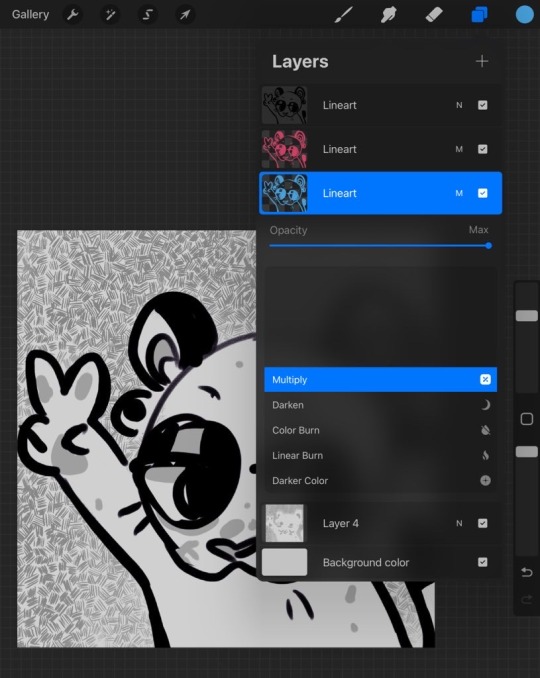

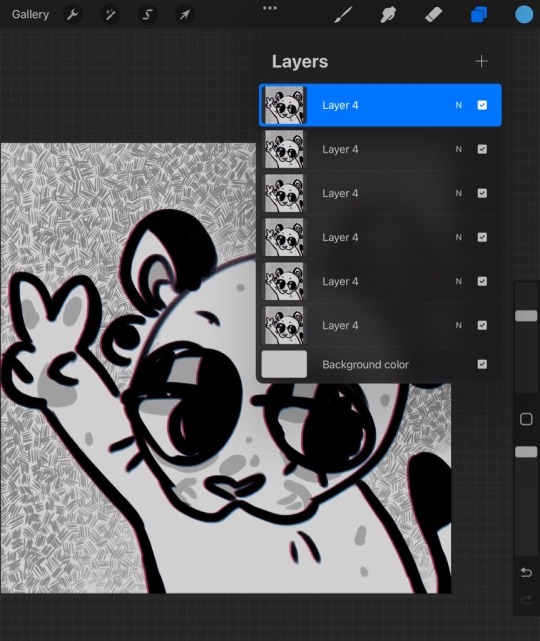
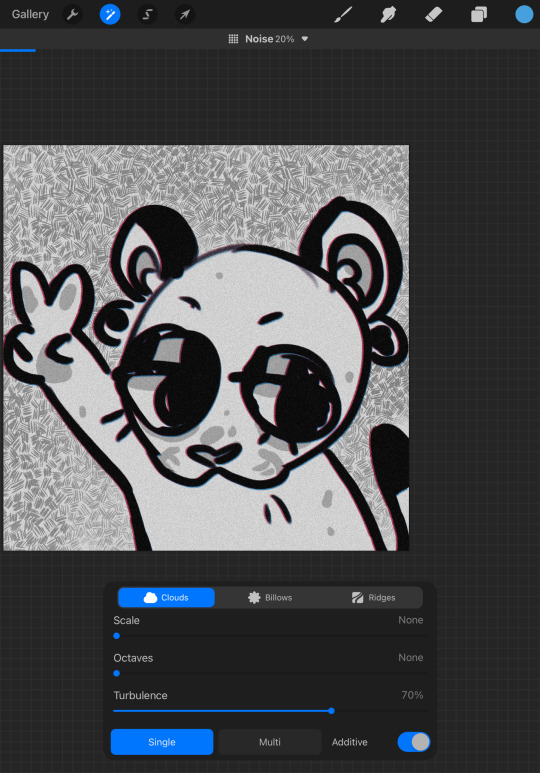

Thought I’d throw this together in case anyone was interested!
-Duplicate lineart layer (3 layers) Fill 2 with red/blue, or other colors, set colored layers to multiply.
-Move the colored lineart slightly off the top one. Merge everything and duplicate a bunch.
- put noise over every layer, varying amount in each layer. Choose a couple random layers to glitch and use the “wave” mode. Adjust to your liking. ✌🏻✨
32 notes
·
View notes
Note
is there a filter you use on your art to get that distinctive tv vibe? I love it so much and wanna learn how to do it

i get asked this alot! i'll show what i use :) its easy🍓
the apps i use to edit my drawings are capcut (free) ibispaint X (free) and rarevision vhs (which i only payed $1 for)

for me, rarevision only takes videos and not photos, so i use capcut to make my drawing into a video first and then i put it into rarevision. (you press the 'play' button to import a video). rarevision has many types of different filters you can put on your videos, and if you click on the menu button you can adjust the color/blurriness/contrast to however you want.

and when thats done, i put it back into capcut to edit the colors/contrast

i also use ibispaint X to fix the cropping and adding a bit more filters like sharpening and stuff so it wouldnt be too blury.

hoped this helped ^_^
95 notes
·
View notes
Note
Hey, do you know any good tutorials or have any advice on how to do stuff like your VHS style? I have been practicing how to mimic the 'cell animation cartoon' look but haven't really gotten the editing to where i like it yet.
link to my other tutorial here but otherwise
i tend to use a thin line/ink brush with some texture. i dont know if this works in copying the VHS style directly but i have an intense hatred of ink brushes and think they never look good so i just stick to the one i know (i use the smooth inker, adjusting the pressure a little) i think a pencil brush or realistic inker would look better though
also have references. whether thats film screenshots, or art books (zlib it my friend)
in terms of edits, again its on the other tutorial ^ but i add a drop shadow, blur the lines and add yellow 'bleed', and for the final edits > saturation, lighten, noise overlays, and using a VHS/TV static overlay set to hue to fuck with colours subtly. again its trial and error, i don't think my VHS style looks like VHS but more what we in the modern era tend to think of as VHS
#art tutorial#vhs tutorial#if you want a specific tip pls let me know! i tend to just ramble here#asks
18 notes
·
View notes
Text
hmm. well i’ve been collecting more and more second hand dvds but I may just have to bite the expensive bullet and buy some of my favourite things from jb hi-fi and sanity before they’re gone forever. yikes.
#i also need to learn how to rip my dvds onto my hard drive but i’m sure there’s tutorials out there#folly’s follies#it’s not that i care particularly about disney as a whole. i mean i’ve got most of my faves on dvd anyway#bc i’m yknow. 22 and grew up in the shift from vhs to dvd#but geez. geeeeez. this WILL set a precedent for other companies we r so fucked#so so glad i bought otgw & gfalls dvds years ago!
2 notes
·
View notes
Text
instagram
1 note
·
View note
Video
youtube
Vegas VHS Effect Tutorial
1 note
·
View note
Text

HELP - WHY ARE THERE SO MANY STEPS IN ACT 1... IT'S JUST THE MACARENA?!? IT'S NOT HARD - I CANT 💀💀💀
Dance the Macarena (1996)
#vhs aesthetic#vhs tapes#vhscore#1990s aesthetic#1990s movies#dance teacher#choreography#dance tutorial#macarena
1 note
·
View note